
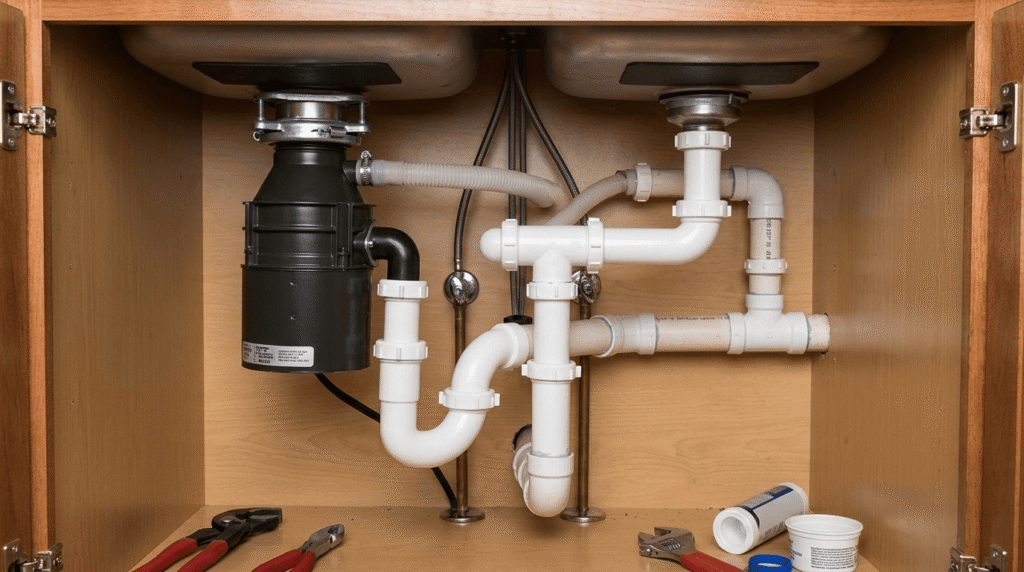
A kitchen sink drain assembly moves wastewater and food debris from the sink basin into the household drain-waste-vent (DWV) system. The assembly connects a strainer at the sink bottom to a trap below the cabinet, using a sequence of threaded and slip-joint fittings that create watertight seals at each junction.
This article explains the individual parts of a kitchen sink drain, the standard sizes used in U.S. residential plumbing, and the installation sequence that connects those parts into a working assembly. It also covers common failure points, such as leaking joints and spinning strainers, and the size differences between kitchen and bathroom sink drains.
Correct part selection and sizing directly affect drain performance. A strainer opening that does not match the sink’s drain hole, or a tailpiece with the wrong outside diameter, prevents the slip-joint nuts from forming a seal and causes leaks under the sink. The sections below identify each part’s function, standard dimensions, and its role in the complete assembly.
Most kitchen sink drains sold in the United States follow the same basic configuration regardless of manufacturer, which allows most strainers, tailpieces, and traps to be mixed and matched across brands as long as the diameters match.
What Is a Kitchen Sink Drain? (Anatomy Overview)
A kitchen sink drain is the assembly of fittings that channels water and waste from the sink bowl through the countertop, under the cabinet, and into the home’s drain pipe. The assembly consists of a strainer, a tailpiece, slip-joint connectors, and a trap, joined in a fixed sequence from the sink basin down to the wall or floor drain stub-out.
Each fitting in the assembly performs a distinct function. The strainer captures solids and seals the sink’s drain opening. The tailpiece extends the drain path below the sink basin. The trap retains a small amount of water to block sewer gas from entering the kitchen. Slip-joint nuts and washers join these components without requiring solvent welding, which allows the assembly to be disassembled for cleaning or repair.
A kitchen sink drain differs from a bathroom sink drain in pipe diameter, strainer size, and trap style, because kitchen sinks handle larger volumes of water and solid food waste. These differences are addressed later in this article.
Kitchen Sink Drain Parts (With Diagram)
A standard kitchen sink drain assembly contains six primary parts: the strainer or basket, a rubber gasket and friction washer, a locknut, a tailpiece, a P-trap, and slip-joint nuts and washers. These parts connect in sequence from the sink basin to the drain stub-out, with the strainer at the top of the assembly and the P-trap at the bottom.
Each part serves a specific mechanical function within the assembly: sealing the sink opening, securing the strainer to the sink, extending the drain path, retaining a water seal against sewer gas, or joining adjacent pipe sections. The following sections describe each part individually, including its function, material, and position in the assembly.
Strainer or Basket
A strainer or basket is the perforated or solid fitting installed in the sink’s drain opening that catches food particles and debris before they enter the drain pipe. It sits at the top of the drain assembly, flush with the bottom of the sink basin.
The strainer body extends through the sink’s drain hole and connects to a flange that rests against the sink surface. A locknut on the underside secures the strainer in place, while a gasket between the strainer and the sink prevents water from leaking around the opening. Removable basket strainers include a stopper or basket insert that seals the drain to hold standing water in the sink, while fixed strainers remain open at all times and rely on a separate stopper mechanism or none at all.
Rubber Gasket and Friction Washer
A rubber gasket and friction washer are sealing components installed between the strainer body and the locknut that prevent water from leaking through the sink’s drain opening. The gasket sits directly against the underside of the sink, and the friction washer sits below the gasket, above the locknut.
The rubber gasket compresses against the sink surface as the locknut tightens, closing the gap between the strainer flange and the sink material. The friction washer, typically made of fiber or rigid plastic, distributes pressure evenly around the locknut and keeps the strainer from rotating once installed. Without this washer, tightening the locknut can twist the gasket out of alignment and cause a leak.
Locknut
A locknut is the threaded fitting that tightens onto the strainer body from below the sink to hold the entire strainer assembly in place. It is the final component installed when mounting a strainer, positioned beneath the friction washer.
The locknut threads onto the strainer’s threaded shaft and compresses the gasket and friction washer against the underside of the sink as it tightens. Most locknuts are made of zinc alloy, stainless steel, or plastic, and are tightened by hand or with slip-joint pliers or a specialty spud wrench. Overtightening a locknut can crack a plastic version, while undertightening leaves the gasket seal incomplete.
Tailpiece
A tailpiece is the straight pipe section that extends downward from the strainer outlet to connect the sink to the trap or waste line below. It attaches directly to the underside of the strainer using a slip-joint nut and washer.
The tailpiece length varies depending on the distance between the sink basin and the trap, and installers commonly cut it to fit during installation. Standard tailpieces measure 1.5 inches in outside diameter, matching the strainer outlet and the inlet of most P-traps. In sinks with a garbage disposal or a double bowl configuration, the tailpiece connects to a disposal unit or a continuous waste fitting instead of running directly to the trap.
P-Trap
A P-trap is the curved section of drain pipe, shaped like the letter P, that retains a standing water seal to block sewer gas from entering the kitchen through the drain. It connects to the bottom of the tailpiece and to the drain stub-out in the wall or floor.
The trap’s curved design holds a column of water inside the bend after each drain cycle, and this water seal remains in place as long as the trap is not siphoned dry. Most P-traps used under kitchen sinks are 1.5 inches in diameter and include a removable cleanout or union joint that allows the trap to be taken apart for clearing clogs. Plumbing codes generally require a trap on every fixture drain, positioned within a specified distance of the fixture outlet.
Slip-Joint Nuts and Washers
Slip-joint nuts and washers are the threaded fittings and beveled seals that join adjacent sections of drain pipe, such as the strainer to the tailpiece or the tailpiece to the trap. Each connection point in the drain assembly below the strainer uses one slip-joint nut and one washer.
The slip-joint nut threads over the pipe and compresses the washer against the joint as it tightens, forming a watertight seal without requiring solvent cement or soldering. This design allows the connection to be hand-tightened and later loosened for cleaning, pipe replacement, or trap access. Most slip-joint washers are made of nylon, rubber, or beveled plastic, and they must match the outside diameter of the pipe to seal correctly.
Standard Kitchen Sink Drain Sizes
Kitchen sink drains in U.S. residential plumbing follow a limited set of standard dimensions across three key measurements: the strainer opening, the drain pipe diameter, and the trap diameter. These standard sizes allow strainers, tailpieces, and traps from different manufacturers to be combined within the same assembly.
The strainer opening in most kitchen sinks measures 3.5 inches, while the drain pipe and trap beneath the strainer measure either 1.5 or 2 inches in diameter, depending on the fixture and local plumbing code requirements. The sections below detail each of these dimensions and explain how to measure an existing drain before purchasing replacement parts.
Strainer Opening Size
The standard strainer opening size for a kitchen sink is 3.5 inches in diameter, which fits the majority of strainer and basket assemblies sold for residential use. This opening size has become the de facto standard across sink manufacturers in the United States.
A small number of older or specialty sinks use a smaller opening, closer to 3 inches, which requires a correspondingly sized strainer. Bar sinks and prep sinks sometimes use these smaller openings because of their reduced basin size. Before purchasing a replacement strainer, the existing opening should be measured across the widest point of the drain hole to confirm compatibility.
Drain Pipe Diameter (1.5″ vs. 2″)
Kitchen sink drain pipes are manufactured in two standard diameters: 1.5 inches and 2 inches, measured as the nominal outside diameter of the tailpiece and trap. The 1.5-inch size is the more common standard for single-bowl kitchen sinks without a garbage disposal.
The 2-inch diameter is used in some older installations and in configurations that require higher drainage capacity, such as certain double-bowl or commercial-style setups, though many modern double-bowl and garbage disposal installations still use 1.5-inch continuous waste fittings that combine both bowls into a single 1.5-inch trap. The two sizes are not interchangeable within the same joint; a 1.5-inch tailpiece requires 1.5-inch slip-joint nuts, washers, and a 1.5-inch trap, while a 2-inch system requires matching 2-inch components throughout.
How to Measure Your Kitchen Sink Drain
To measure a kitchen sink drain, remove the trap and tailpiece, then measure the outside diameter of the pipe with a tape measure or calipers at the widest point of the fitting. This measurement determines whether the drain uses the 1.5-inch or 2-inch standard.
The strainer opening should be measured separately, across the diameter of the hole in the sink basin, to confirm it matches a 3.5-inch or 3-inch strainer. When replacing a trap or tailpiece without disassembling the full drain, the diameter can also be estimated by comparing the pipe against a tape measure held flush against the outside edge. Matching every measurement to the existing components prevents leaks caused by mismatched slip-joint connections.
Types of Kitchen Sink Strainers and Baskets
Kitchen sink strainers and baskets are classified into two main types based on function, removable basket strainers and fixed strainers, and into three main types based on material, stainless steel, zinc alloy, and brass. These classifications determine how the strainer holds standing water and how it resists corrosion over time.
The choice between a removable and fixed strainer affects daily use, while the choice of material affects durability and maintenance. The following sections compare each classification using consistent criteria.
Basket (Removable) Strainer vs. Fixed Strainer
A basket strainer includes a removable stopper insert that seals the drain to hold standing water in the sink, while a fixed strainer remains permanently open and does not seal the drain on its own. This is the primary functional difference between the two strainer types.
Basket strainers are the standard choice for sinks used for washing dishes or soaking items, because the removable basket lifts out to empty debris and the stopper allows the basin to fill with water. Fixed strainers are common in utility sinks, bar sinks, and disposal-equipped basins where standing water is not required, and they typically cost less because they contain fewer moving parts. Basket strainers require periodic replacement of the rubber seal on the stopper, while fixed strainers have no seal to maintain.
Material Comparison: Stainless Steel vs. Zinc vs. Brass
Stainless steel, zinc alloy, and brass are the three primary materials used to manufacture kitchen sink strainers, and they differ in corrosion resistance, weight, and cost. Stainless steel offers the highest corrosion resistance of the three materials and does not rust when exposed to water and food acids.
Zinc alloy strainers cost less than stainless steel or brass but are more prone to corrosion and pitting over time, particularly in areas with hard or acidic water. Brass strainers resist corrosion well and offer higher durability than zinc, though solid brass strainers are heavier and typically cost more than stainless steel. Chrome-plated brass or zinc strainers combine a decorative finish with the base metal’s underlying properties, but the plating can wear through with repeated scrubbing, exposing the base metal to corrosion.
How to Install a Kitchen Sink Drain
Installing a kitchen sink drain involves mounting the strainer in the sink basin, attaching the tailpiece, and connecting the assembly to the P-trap and drain stub-out using slip-joint fittings. The full process typically takes 30 to 60 minutes for a single-bowl sink without a garbage disposal.
Installation requires the correct tools and matching part sizes before work begins, followed by a defined sequence of steps to mount the strainer, connect the tailpiece, and complete the trap connection. The sections below cover the required tools, the full step sequence, and specific guidance for strainer installation, trap connection, and disposal or double-bowl configurations.
Tools and Parts You’ll Need
Installing a kitchen sink drain requires slip-joint pliers, a screwdriver or drill, plumber’s putty or silicone sealant, and the drain assembly parts: a strainer, tailpiece, slip-joint nuts and washers, and a P-trap. A basin wrench may also be needed in tight cabinet spaces.
Plumber’s putty is used to seal the strainer flange against the sink basin, though some manufacturers specify silicone sealant instead for certain sink materials, such as natural stone or composite granite. All slip-joint nuts, washers, and pipe sections must match the drain’s diameter, either 1.5 or 2 inches, to form a proper seal at each connection.
Step-by-Step Installation
To install a kitchen sink drain, apply plumber’s putty to the strainer flange, insert the strainer into the sink’s drain opening, and secure it from below with the gasket, friction washer, and locknut. The remaining steps connect the tailpiece and trap to complete the assembly.
- Apply a rope of plumber’s putty around the underside of the strainer flange.
- Insert the strainer into the sink’s drain opening from above.
- From below the sink, slide the rubber gasket and friction washer onto the strainer’s threaded shaft.
- Thread the locknut onto the strainer and tighten it with slip-joint pliers.
- Remove excess putty that squeezes out around the flange.
- Attach the tailpiece to the strainer outlet using a slip-joint nut and washer.
- Connect the P-trap to the tailpiece and to the drain stub-out, using slip-joint nuts and washers at each end.
- Tighten all slip-joint connections by hand, then run water to check for leaks at every joint.
Installing the Strainer or Basket
To install a strainer or basket, center a rope of plumber’s putty around the flange, press the strainer into the drain opening, and tighten the locknut from underneath the sink until the putty forms a visible, even seal. Excess putty should be wiped away once the flange is snug against the sink surface.
The locknut should be tightened enough to compress the gasket fully, without overtightening to the point of cracking a plastic locknut or deforming the gasket. After installation, the strainer should sit flush with the sink basin and remain stationary without spinning when the basket or stopper is inserted and removed.
Connecting the Tailpiece and P-Trap
To connect the tailpiece and P-trap, slide a slip-joint nut and washer onto the tailpiece, insert the tailpiece into the trap’s inlet, and hand-tighten the nut until the washer compresses into a watertight seal. The same process joins the trap’s outlet to the drain stub-out in the wall or floor.
The tailpiece may need to be cut to length with a hacksaw or tubing cutter if it extends too far below the trap connection point. The trap should be positioned so its curved bend sits below the tailpiece outlet and above the stub-out, maintaining the water seal that blocks sewer gas. Once connected, each slip-joint nut should be tightened by hand and checked for leaks under running water before the pliers are used for final tightening.
Installing a Drain With a Garbage Disposal or Double Bowl
Installing a drain with a garbage disposal requires connecting the disposal unit’s discharge tube directly to the trap or to a second bowl’s continuous waste fitting, instead of connecting the tailpiece straight to the trap. A double-bowl sink without a disposal uses a continuous waste fitting to join both tailpieces into a single trap.
In a garbage disposal setup, the sink’s strainer assembly on the disposal side is replaced by the disposal’s flange and mounting assembly, and the disposal’s discharge tube connects to the trap using a rubber coupling and hose clamp or a slip-joint connection, depending on the disposal model. In a double-bowl configuration, a continuous waste tee or fitting joins the two tailpieces at a common point before the combined waste line enters the single P-trap, which prevents the need for two separate traps under one sink.
How to Replace an Old Kitchen Sink Drain
To replace an old kitchen sink drain, disconnect the existing trap and tailpiece, remove the old strainer’s locknut, and install a new strainer, tailpiece, and trap following the same sequence used for a new installation. Replacement is typically necessary when the strainer leaks, corrodes, or spins loose, or when the trap or tailpiece develops cracks or persistent leaks at the slip-joint connections.
Before removing the old assembly, a bucket should be placed under the trap to catch residual water. The old locknut is loosened with slip-joint pliers or a spud wrench, and the strainer is pushed up and out of the sink from above once the locknut, friction washer, and gasket are removed. Old putty residue should be scraped from the sink surface before installing the new strainer, since leftover putty can prevent the new gasket from forming a flat seal. The remaining installation steps, mounting the new strainer, attaching the tailpiece, and connecting the trap, follow the same process described in the installation section above.
Common Kitchen Sink Drain Problems and How to Fix Them
The most common kitchen sink drain problems are leaks at the gasket or slip-joint connections, a loose or spinning basket strainer, and improper trap configurations that cause slow drainage or gas odors. Each problem has a distinct cause and repair method.
Most drain problems result from a compromised seal, a loose fitting, or an incorrect pipe configuration rather than a failure of the pipe material itself. The sections below identify the cause and fix for each common problem.
Leaking at the Gasket or Slip-Joint
A leak at the gasket or slip-joint is caused by a worn, cracked, or improperly seated washer, or by a slip-joint nut that has loosened over time. This is one of the most frequent kitchen sink drain problems and typically appears as water pooling under the sink after use.
To fix a gasket or slip-joint leak, first tighten the affected slip-joint nut by hand while checking for continued dripping under running water. If tightening the nut does not resolve the leak, the nut should be loosened, the washer inspected for cracks or deformation, and a new washer of matching diameter installed before retightening. A leak at the strainer flange itself, rather than at a slip-joint, usually indicates deteriorated plumber’s putty and requires removing the strainer to reapply a fresh seal.
Loose or Spinning Basket Strainer
A loose or spinning basket strainer occurs when the locknut beneath the sink has loosened, allowing the strainer body to rotate freely in the drain opening instead of remaining fixed. This condition often develops gradually as the plumber’s putty seal degrades and the locknut vibrates loose over time.
To fix a spinning strainer, access the locknut from beneath the sink and tighten it with slip-joint pliers or a spud wrench while holding the strainer basket steady from above to prevent it from turning with the nut. If tightening does not stop the spinning, the strainer should be removed, the old putty replaced, and the gasket, friction washer, and locknut reinstalled with the locknut tightened to a firm, even resistance without overtightening.
Improper Trap Configuration (“Double Trapping”)
Double trapping occurs when a drain line contains two P-traps in series instead of one, which creates an air pocket between the traps that slows drainage and can cause gurgling or backups. This condition commonly results from adding an extra trap during a remodel or disposal installation without removing the original trap.
To fix a double-trapping condition, the drain line should be inspected from the fixture to the stub-out to identify both traps, and the redundant trap should be removed so that only a single trap remains in the waste line. Most plumbing codes prohibit double trapping because the trapped air pocket prevents proper venting and can cause the downstream trap to lose its water seal through siphoning.
How to Choose the Best Kitchen Sink Drain for Your Sink
The best kitchen sink drain for a given sink is determined by matching the strainer opening size, the drain pipe diameter, and the strainer type to the sink’s existing configuration and intended use. A mismatch in any of these three factors prevents a proper seal or requires additional adapter fittings.
For a sink used to wash and soak dishes, a removable basket strainer allows the basin to hold standing water, while a fixed strainer suits a sink paired with a garbage disposal or used primarily for rinsing. The drain pipe diameter, either 1.5 or 2 inches, should match the existing trap and stub-out rather than be selected independently, since changing diameters requires replacing the entire waste line rather than a single component. Material selection affects long-term durability: stainless steel resists corrosion best in areas with hard or acidic water, while zinc alloy offers a lower-cost option for standard residential use. For a double-bowl sink or a sink with a garbage disposal, the strainer and tailpiece on the disposal side must be compatible with the disposal’s mounting flange and discharge tube, which may require a specific strainer designed for disposal installations rather than a standard basket strainer.
Kitchen Sink Drain vs. Bathroom Sink Drain: Key Differences
A kitchen sink drain differs from a bathroom sink drain primarily in pipe diameter, strainer size, and stopper mechanism, because kitchen sinks handle larger volumes of water, grease, and solid food waste. Kitchen drains typically use 1.5-inch or 2-inch pipe with a 3.5-inch strainer opening, while bathroom drains commonly use 1.25-inch pipe with a smaller strainer or pop-up assembly.
| Feature | Kitchen Sink Drain | Bathroom Sink Drain |
|---|---|---|
| Standard pipe diameter | 1.5″ or 2″ | 1.25″ |
| Strainer opening | 3.5″ | Varies with pop-up assembly |
| Stopper mechanism | Removable basket strainer | Pop-up stopper linked to a lift rod |
| Trap size | 1.5″ or 2″ P-trap | 1.25″ P-trap |
| Typical waste content | Food debris, grease | Soap, hair, toothpaste residue |
The stopper mechanism represents the clearest functional difference between the two drain types. Kitchen sinks use a removable basket that lifts out for cleaning, while bathroom sinks use a pop-up stopper connected to a lift rod behind the faucet that raises and lowers the stopper without removing it from the drain. Bathroom drains also handle finer waste, such as hair and soap residue, which makes them more prone to slow clogs despite their smaller waste volume compared to kitchen sinks.