
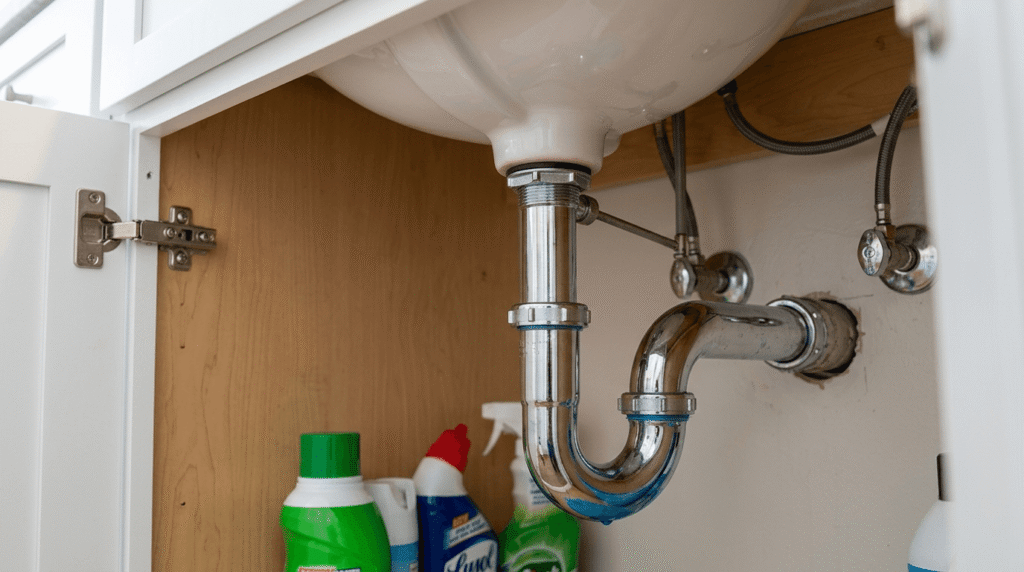
A P-trap is a curved section of drainpipe installed beneath sinks, tubs, showers, and other plumbing fixtures. The pipe forms a U-shaped bend that retains a small amount of water after each use. This retained water blocks the connection between the fixture and the building’s drain-waste-vent (DWV) system.
The trap serves one primary function: it prevents sewer gas from entering occupied spaces through the fixture drain. Every plumbing code in North America requires a trap on fixtures connected to the drainage system, with the P-trap as the standard configuration for sinks, tubs, and showers.
A P-trap consists of several connected parts, including a tailpiece, a curved trap bend, a trap arm, and slip-joint or solvent-welded connections. These parts work together to hold a water seal while allowing wastewater to pass through to the drain line. The trap connects to a vent pipe, which equalizes air pressure and keeps the water seal from being pulled out by siphoning.
This guide explains how a P-trap functions, the materials and sizes available, installation and code requirements, and the most common problems that affect P-traps in residential plumbing systems.
What Does a P-Trap Do?
A P-trap blocks sewer gas from entering a building through a fixture’s drain opening. The curved section of pipe retains standing water after each use, and this water forms a physical barrier between the drain line’s open air space and the room.
Sewer gas contains methane, hydrogen sulfide, and other compounds produced by decomposing waste in the drain-waste-vent system. Without a trap, these gases would travel unobstructed through the drainpipe and into the fixture area. The P-trap’s water seal closes this path while still permitting wastewater and debris to flow through the pipe toward the main drain line. A properly functioning P-trap requires a consistent water seal, which depends on regular fixture use, correct installation, and an adequately vented drain line.
How a P-Trap Works
A P-trap works by holding a column of water in its lowest bend after wastewater drains through the fixture. Water enters the trap through the tailpiece, fills the curved section, and exits through the trap arm toward the branch drain line. Gravity and the pipe’s shape cause a portion of that water to remain in the bend once the flow stops, and this remaining water forms the seal that blocks sewer gas.
The trap depends on connection to a vent pipe to function correctly. The vent equalizes air pressure on both sides of the trap, which prevents fast-moving wastewater from siphoning the water seal out of the bend. Without adequate venting, drainage from the fixture or a nearby fixture can pull the water seal down or empty it completely, allowing sewer gas to pass into the room.
The Water Seal (Weir)
The water seal, also called the weir, is the standing water retained in the lowest section of a P-trap’s curved bend. Plumbing codes typically require a trap seal depth of 2 to 4 inches, measured from the bottom of the dip to the crown of the trap’s outlet.
The weir height determines how much water must be lost through evaporation, siphoning, or a slow leak before the trap fails to block sewer gas. A deeper seal provides more resistance to evaporation in fixtures used infrequently, while a shallower seal is more vulnerable to siphoning in poorly vented systems. Regular fixture use replenishes the seal and maintains its protective function.
Wet Trap vs. Dry Trap
A wet trap contains its intended water seal, while a dry trap has lost some or all of that water and no longer blocks sewer gas effectively. A trap becomes dry through evaporation during extended periods of disuse, through siphoning caused by inadequate venting, or through a leak at a joint or connection.
A dry trap allows sewer gas to enter the fixture area, which produces a noticeable odor near the drain. Running water through the fixture for several seconds typically refills the trap and restores the seal in cases caused by evaporation. A trap that repeatedly runs dry despite regular use indicates a venting problem, a leak, or a defect in the trap or drain line that requires further inspection.
Parts of a P-Trap
A standard P-trap assembly includes a tailpiece, a curved trap bend, a trap arm, a cleanout plug, and slip nuts with washers at each connection point. Each component connects to form a continuous, water-holding path between the fixture drain and the branch drain line.
The tailpiece extends downward from the fixture’s drain opening, and the curved bend beneath it retains the water seal. The trap arm carries wastewater from the bend to the branch drain, and slip nuts with rubber or nylon washers create removable, watertight joints at each connection. Many P-traps also include a cleanout plug at the base of the curved bend, which allows access for clearing debris without disassembling the trap.
Trap Arm and Tailpiece
The tailpiece is the vertical pipe section connecting the fixture’s drain outlet to the top of the P-trap, and the trap arm is the horizontal pipe section connecting the trap’s outlet to the branch drain line. The tailpiece carries wastewater downward from the fixture, while the trap arm carries wastewater away from the trap toward the drain-waste-vent system.
Fixture manufacturers size tailpieces to match standard trap diameters, most commonly 1¼ inches for bathroom sinks and 1½ inches for kitchen sinks. The trap arm’s length and slope are subject to plumbing code limits, since an arm that is too long or improperly sloped can compromise the trap’s water seal.
Cleanout Plug
A cleanout plug is a removable fitting located at the lowest point of a P-trap’s curved bend, and it provides direct access to clear clogs without removing the entire trap assembly. The plug threads into a fitting on the trap body and seals with a washer to maintain the water-tight connection.
Removing the cleanout plug allows a plumber or homeowner to drain the trap and clear debris using a small brush, a bent wire, or a plumbing snake. Not all P-traps include a cleanout plug; some designs rely on removing the slip nuts to access the interior of the trap instead.
Slip Nuts and Washers
Slip nuts are threaded fittings that compress a washer against a pipe to create a removable, watertight seal at each P-trap connection. Each joint in a P-trap assembly, including the tailpiece, trap arm, and cleanout, typically uses a slip nut paired with a beveled or flat washer.
Slip nuts allow the trap to be disassembled by hand for cleaning, inspection, or replacement, without the need for solvent welding or soldering. Washers wear down or crack over time from repeated tightening and exposure to water, and a worn washer is a common cause of slow leaks at trap joints.
Types of Plumbing Traps
The main types of plumbing traps include the P-trap, the S-trap, the bottle trap, and legacy designs such as the drum trap and the running trap. Plumbing traps differ primarily in pipe shape, venting compatibility, and code acceptance in modern construction.
The P-trap is the standard trap for most residential fixtures because its shape allows a connection to a vent pipe on the downstream side of the water seal. The S-trap, bottle trap, and legacy trap types differ from the P-trap in shape, venting behavior, or code status, which affects where each type is permitted and how reliably it maintains its water seal.
P-Trap vs. S-Trap
A P-trap connects to a horizontal trap arm and a vent pipe, while an S-trap connects directly to a vertical drain line without a horizontal arm to a vent. This structural difference determines whether the trap can maintain a stable water seal.
Most current plumbing codes prohibit new S-trap installations because the S-shaped bend allows fast-draining water to create a siphoning effect that empties the trap’s water seal. A P-trap avoids this problem because its horizontal trap arm connects to a vent that equalizes air pressure during drainage. Older homes built before current code adoption may still contain S-traps, and these are typically flagged for replacement during renovations or inspections.
P-Trap vs. Bottle Trap
A P-trap uses a continuous curved pipe to hold its water seal, while a bottle trap uses a cylindrical chamber with a removable base to achieve the same function. Both trap types block sewer gas, but they differ in shape, cleaning method, and typical application.
A bottle trap requires less horizontal space than a P-trap, which makes it a common choice for pedestal sinks or wall-mounted fixtures with limited cabinet depth. Cleaning a bottle trap involves unscrewing the base chamber rather than accessing a cleanout plug. Some plumbing codes restrict bottle traps to specific fixture types due to their narrower internal passages, which can trap debris more readily than a standard P-trap.
P-Trap vs. J-Bend
“P-trap” and “J-bend” often refer to the same curved fitting, though the terms describe different parts of the full assembly in precise usage. The J-bend is the curved pipe section shaped like the letter J, while the P-trap refers to the complete assembly that includes the J-bend, the trap arm, and the connecting fittings.
Retail plumbing suppliers frequently sell the curved fitting alone under the name “J-bend” or “P-trap,” which creates overlapping usage of both terms. The distinction matters primarily when ordering replacement parts, since a J-bend purchase typically includes only the curved section rather than the trap arm and tailpiece.
Drum Traps and Running Traps (older/legacy types)
A drum trap is a cylindrical container-style trap historically installed beneath bathtubs, while a running trap is a large trap installed in the main building drain line before it exits the foundation. Both trap types appear in older buildings and are largely obsolete in current construction.
Drum traps hold a larger water volume than a P-trap, which made them resistant to siphoning in older, poorly vented systems, but their design traps debris and makes cleaning difficult. Running traps served as a single trap for an entire building’s drainage system before individual fixture traps became standard practice. Current plumbing codes in most jurisdictions no longer permit new drum trap or running trap installations, and existing units are typically replaced during major plumbing renovations.
P-Trap Materials: PVC, Brass, Chrome, and More
P-traps are manufactured from PVC, ABS, brass, chrome-plated brass, and flexible plastic, with material choice depending on the fixture’s location, visibility, and exposure to chemicals or heat. Each material offers a different balance of cost, durability, and appearance.
PVC and ABS traps are the most common choice for concealed plumbing, such as beneath a kitchen sink cabinet, because of their low cost and chemical resistance. Brass and chrome-plated traps are used where the trap remains visible, such as beneath a pedestal sink, because of their finished appearance. Flexible or adjustable traps accommodate non-standard drain alignments in retrofit installations.
PVC P-Traps
A PVC P-trap is a rigid plastic trap made from polyvinyl chloride, and it is the most common trap material used in concealed residential plumbing. PVC resists corrosion from most household chemicals and does not require a finished appearance, since the trap is typically hidden inside a cabinet.
PVC traps connect using solvent welding for permanent joints or slip nuts for removable joints, and both connection types are widely accepted under current plumbing codes. PVC traps cost less than metal alternatives and withstand typical drain temperatures, though extremely hot, undiluted water discharged directly into the trap can soften the plastic over time.
Brass and Chrome-Plated P-Traps
A brass P-trap is a metal trap that provides higher physical durability than plastic, and a chrome-plated brass P-trap adds a polished finish for use in visible locations. Both materials resist denting and impact damage better than PVC.
Chrome-plated brass traps are commonly installed beneath pedestal sinks, wall-hung sinks, and other fixtures where the plumbing remains exposed to view. Brass traps corrode over time when exposed to certain water chemistries or cleaning chemicals, which can eventually cause pinhole leaks in the trap wall. Chrome-plated finishes also scratch or wear thin with repeated cleaning using abrasive materials.
Flexible / Adjustable P-Traps
A flexible or adjustable P-trap is a trap assembly with corrugated or telescoping sections that allow the trap to align with drain openings that are offset or non-standard. This design accommodates fixture and drain positions that a rigid trap cannot reach without additional fittings.
Flexible traps are commonly used in retrofit plumbing, mobile installations, or situations where the drain stub-out does not align directly beneath the fixture’s tailpiece. The corrugated sections that provide flexibility also create more surface area for debris to collect, which can make flexible traps more prone to clogging than rigid PVC or metal traps.
P-Trap Sizes and Dimensions
P-traps are manufactured in standard diameters of 1¼ inches, 1½ inches, and 2 inches, with the correct size determined by the fixture’s drain outlet and the applicable plumbing code. Selecting the correct diameter affects both drainage performance and code compliance.
Smaller fixtures with lower wastewater volume, such as bathroom sinks, typically use narrower traps, while fixtures with higher flow rates, such as kitchen sinks and showers, use wider traps. Plumbing codes specify minimum trap and drain sizes for each fixture type, and installing an undersized trap can restrict drainage or violate local code requirements.
1¼” vs. 1½” vs. 2″ Traps
A 1¼-inch trap is sized for low-flow fixtures such as bathroom sinks, a 1½-inch trap is sized for higher-flow fixtures such as kitchen sinks and tubs, and a 2-inch trap is sized for fixtures with the highest flow demands, such as showers or floor drains. Trap diameter must match the fixture’s minimum drain size as specified by local plumbing code.
A trap sized too small for its fixture restricts water flow and increases the likelihood of clogs, since debris has less room to pass through the bend. A trap sized too large for its fixture can reduce drainage velocity, which allows solids to settle rather than flow through with the water. Matching the trap diameter to the fixture’s rated drain size avoids both problems.
How to Choose the Right Size for Your Fixture
Choose a P-trap size by matching the trap diameter to the fixture’s drain outlet size and the minimum size required by local plumbing code for that fixture type. Most fixture manufacturers specify the required trap size in the installation instructions.
Bathroom sinks typically require a 1¼-inch trap, kitchen sinks and bathtubs typically require a 1½-inch trap, and showers or floor-mounted fixtures typically require a 2-inch trap. When a fixture’s tailpiece diameter differs from the available trap size, a reducing washer or adapter fitting allows the connection while maintaining the trap’s rated diameter. Confirming the required size against the local plumbing code before installation avoids a failed inspection.
P-Traps by Fixture and Use Case
P-traps are installed beneath kitchen sinks, bathroom sinks, showers, bathtubs, washing machines, dishwashers, and air conditioning condensate lines, with the trap’s size, material, and configuration adapted to each fixture’s drainage characteristics. Every fixture connected to the drain-waste-vent system requires a trap to prevent sewer gas from entering the building.
Fixture type determines the trap’s required diameter, the expected wastewater volume and content, and any special configuration needed to accommodate the fixture’s drain location. A kitchen sink trap, for example, must accommodate food waste and grease, while an AC condensate trap must accommodate a small, steady volume of clean water rather than typical wastewater.
Kitchen Sink P-Trap
A kitchen sink P-trap is typically a 1½-inch trap installed beneath the sink cabinet, and it connects to the sink’s drain outlet through a tailpiece that may include a garbage disposal or double-basin configuration. The trap collects food particles, grease, and wastewater discharged from the sink and disposal unit.
Grease and food debris are more likely to accumulate in a kitchen sink trap than in other fixture traps, which makes kitchen P-traps more prone to clogging over time. A double-basin kitchen sink typically uses a continuous waste fitting to combine both drain lines before they enter a single trap.
Bathroom Sink P-Trap
A bathroom sink P-trap is typically a 1¼-inch trap installed beneath the sink basin, and it connects to the sink’s drain through a pop-up or grid-style stopper assembly. The trap manages a lower wastewater volume than a kitchen sink trap, since bathroom sinks are not used for food preparation or disposal.
Hair, soap residue, and toothpaste are the most common materials that accumulate in a bathroom sink trap, and these substances can combine to form clogs over time. Pedestal and wall-mounted bathroom sinks commonly use a chrome-plated or brass trap because the plumbing remains visible beneath the fixture.
Shower and Bathtub P-Trap
A shower or bathtub P-trap is typically a 1½-inch or 2-inch trap installed within the floor or wall cavity beneath the fixture, connecting the drain to the branch drain line. Because the trap is enclosed within the floor structure, it is generally inaccessible without removing flooring or accessing a cleanout from below.
Hair and soap scum are the primary causes of clogs in shower and bathtub traps, and buildup accumulates gradually with regular use. Shower and bathtub traps require correct slope and support during installation, since the trap’s inaccessible location makes later adjustments difficult.
Washing Machine and Dishwasher P-Trap
A washing machine P-trap is a standpipe-mounted trap that receives discharge water from the washing machine’s drain hose, while a dishwasher’s discharge typically routes through the kitchen sink’s trap or garbage disposal rather than using a separate trap. Washing machine drains require their own dedicated trap because they connect through an open standpipe rather than a direct fixture connection.
A washing machine standpipe trap must be sized and vented according to the appliance manufacturer’s specifications and local plumbing code, since washing machines discharge water at higher volume and velocity than typical sink fixtures. Dishwashers connect to the drain system through a high loop or air gap fitting that prevents backflow, with wastewater ultimately passing through the kitchen sink’s existing trap.
AC Condensate Line P-Trap
An AC condensate line P-trap is a small trap installed in the condensate drain line of a central air conditioning or furnace system, and it prevents air from being pulled backward through the condensate line by the system’s blower fan. Unlike fixture traps, an AC condensate trap manages a steady, low-volume flow of clean water produced by the cooling coil rather than typical wastewater.
The trap’s water seal prevents negative air pressure created by the HVAC blower from disrupting proper condensate drainage, which could otherwise cause the drain pan to overflow. Manufacturers specify the required trap depth for condensate lines, and this depth is generally shallower than a standard fixture trap because condensate flow volume and pressure differ from fixture drainage.
Laundry, Utility Sink, and RV P-Traps
Laundry sinks, utility sinks, and RV plumbing systems use P-traps sized and configured for their specific drain connections, generally following the same 1½-inch standard used for similar residential fixtures. A laundry or utility sink trap manages wastewater from hand-washing, cleaning, or overflow from a nearby washing machine standpipe.
RV plumbing systems often use compact or flexible P-traps due to limited space beneath fixtures, and these traps require additional attention in cold climates because RV plumbing lacks the insulation of a residential structure. Utility and laundry sink traps are subject to the same clogging risks as other sink traps, particularly from lint, sediment, or cleaning residue.
How to Install a P-Trap
Install a P-trap by connecting the tailpiece to the fixture’s drain outlet, securing the curved trap bend beneath the tailpiece, and connecting the trap arm to the branch drain line with the correct slope and orientation. Each connection uses either slip nuts with washers or solvent-welded joints, depending on the trap material.
Correct P-trap installation depends on matching the trap orientation to the drain outlet’s position, maintaining the required distance between the trap and the vent connection, and selecting the appropriate joint type for the trap material. An incorrectly installed P-trap can lose its water seal through siphoning or leak at a poorly seated connection.
Correct Orientation and Direction
A P-trap must be oriented so its curved bend directs wastewater from the tailpiece toward the trap arm and branch drain line without reversing the flow path. The inlet side of the trap connects to the fixture’s tailpiece, and the outlet side connects to the trap arm leading to the drain.
Installing a trap backward or at an incorrect angle can prevent the trap from holding its water seal or restrict wastewater flow. Manufacturers mark the inlet and outlet sides of most P-trap kits, and following this orientation during installation ensures the trap functions as designed.
Distance From the Drain Outlet
The distance between a P-trap and its drain outlet, measured as the length of the trap arm, is subject to a maximum limit set by local plumbing code and based on the trap arm’s diameter and slope. Plumbing codes limit this distance because an overly long trap arm increases the risk of siphoning the water seal during drainage.
A trap arm must also maintain a minimum downward slope toward the drain, generally within a range specified by the applicable code, to ensure wastewater flows without pooling. Exceeding the maximum allowable trap arm distance typically requires relocating the vent connection closer to the trap or installing an additional fitting to bring the installation into compliance.
Slip-Joint vs. Solvent-Welded Connections
A slip-joint connection uses a slip nut and washer to create a removable, hand-tightened seal, while a solvent-welded connection uses PVC or ABS cement to permanently bond two pipe sections together. Both connection types create a watertight joint, but they differ in whether the joint can be disassembled.
Slip-joint connections allow a P-trap to be removed for cleaning or replacement without cutting the pipe, which makes them the standard choice for trap assemblies. Solvent-welded connections are used for permanent sections of drainpipe beyond the trap, such as the branch drain line, where disassembly is not required for routine maintenance.
How to Remove, Replace, or Clean a P-Trap
Remove, replace, or clean a P-trap by loosening the slip nuts at the tailpiece and trap arm, lowering the trap to drain its contents, and then clearing debris or installing a replacement trap before reconnecting the joints. A bucket placed beneath the trap before loosening the nuts catches the water and debris released from the trap.
This process requires only hand tools in most cases, since slip-joint connections are designed for removal without cutting or solvent welding. Turning off the fixture’s water supply is not required for trap work, since the trap connects to the drain line rather than the supply lines.
Step-by-Step Removal
To remove a P-trap, place a bucket beneath the assembly, loosen the slip nuts at the tailpiece and trap arm by hand or with pliers, and slide the trap downward and free from both connection points. Loosening both slip nuts allows the curved section to separate from the pipe on each side.
- Place a bucket or shallow pan beneath the trap to catch water and debris.
- Loosen the slip nut connecting the trap to the tailpiece.
- Loosen the slip nut connecting the trap to the trap arm.
- Slide the trap downward and away from both pipe connections.
- Empty the trap’s contents into the bucket.
Inspect the washers at each joint during removal, since a worn or cracked washer should be replaced before reinstalling the trap.
Cleaning Out a Clog
Clean a clogged P-trap by removing the trap from its connections, emptying its contents, and clearing any trapped debris using a brush, a bent wire, or a plumbing snake. Traps with a cleanout plug allow this process to be performed without fully removing the trap assembly.
To clean out a clog using a cleanout plug, unscrew the plug at the base of the trap, allow the contents to drain into a bucket, and clear debris from the opening with a small brush or wire before reinstalling the plug. If a trap lacks a cleanout plug, removing the slip nuts and taking the trap apart provides the same access. Reinstalling the trap requires reseating each washer correctly and hand-tightening the slip nuts before testing for leaks with running water.
P-Trap Codes and Venting Requirements
Plumbing codes require every P-trap to connect to a vent pipe within a maximum horizontal distance that depends on the trap arm’s diameter, and they require a minimum trap seal depth of 2 to 4 inches. These requirements maintain the trap’s water seal and prevent sewer gas from entering the building.
The International Plumbing Code and the Uniform Plumbing Code both establish trap and vent requirements, though specific distance limits and exceptions can vary by local jurisdiction. Compliance with these code requirements is verified during plumbing inspections for new construction, renovations, and fixture replacements.
Minimum and Maximum Distance to the Drain
Plumbing code limits the distance between a P-trap’s outlet and its vent connection, with the maximum distance increasing as the trap arm’s diameter increases. A trap arm that exceeds this maximum distance loses adequate air pressure equalization from the vent, which increases the risk of siphoning the water seal during drainage.
Local plumbing codes publish specific maximum trap arm distances by pipe diameter, and these figures vary between the International Plumbing Code, the Uniform Plumbing Code, and local amendments. Consulting the applicable local code before installation ensures the trap arm length and vent placement meet the jurisdiction’s specific requirements.
When a Trap Primer Is Required
A trap primer is required for floor drains and other infrequently used fixtures where evaporation is likely to dry out the trap’s water seal between uses. Plumbing codes typically mandate a trap primer connection for floor drains in commercial buildings and in some residential applications, such as unfinished basements.
A trap primer automatically introduces a small amount of water into the trap at set intervals or in response to a pressure change in the water supply line, which replenishes the seal without requiring the fixture to be used. Floor drains connected to areas with infrequent water use, such as mechanical rooms or garages, are the most common application for trap primers.
Common P-Trap Problems and How to Fix Them
The most common P-trap problems are clogs, leaks at the joints, sewer gas odor from a dry trap, and frozen traps in cold climates. Each problem has a distinct cause and a corresponding repair method.
Diagnosing a P-trap problem starts with identifying whether the issue involves slow or blocked drainage, visible water at a connection, an odor near the fixture, or a complete lack of flow. Most P-trap problems can be resolved without professional assistance, though persistent or recurring issues may indicate a venting or drain line problem beyond the trap itself.
Clogs
A P-trap clog occurs when hair, grease, food debris, soap residue, or other material accumulates inside the curved bend and restricts or blocks water flow. Clogs develop gradually as debris collects along the trap’s interior walls or settles in the lowest point of the bend.
Clearing a clog typically involves removing the trap to physically extract the blockage, since the trap’s curved shape often prevents a plunger or drain snake from reaching debris lodged inside the bend. A slow-draining fixture with no visible leak is the most common sign of a developing clog before it fully blocks the trap.
Leaks at the Joints
A leak at a P-trap joint occurs when a slip nut is not tightened sufficiently, when a washer is worn or improperly seated, or when the pipe ends are not aligned correctly within the fitting. Leaks typically appear as water pooling beneath the trap or dripping from a specific connection point.
Fixing a joint leak generally involves loosening the slip nut, inspecting the washer for cracks or deformation, repositioning the pipe ends, and retightening the nut by hand. Replacing a worn washer resolves most joint leaks that persist after retightening the connection.
Sewer Gas Odor (Dry Trap)
A sewer gas odor near a fixture indicates that the P-trap has lost its water seal and no longer blocks gas from the drain line. A dry trap results from extended disuse, evaporation, siphoning caused by inadequate venting, or a slow leak that gradually empties the trap.
Running water through the affected fixture for several seconds typically resolves an odor caused by simple evaporation in an infrequently used drain. An odor that returns quickly after refilling the trap points to a siphoning problem in the vent system or a leak in the trap itself, and either condition may require inspection beyond refilling the trap.
Frozen Traps in Cold Climates
A frozen P-trap occurs when the standing water in the trap’s bend freezes due to exposure to sustained low temperatures, typically in unheated spaces, exterior walls, or unconditioned crawl spaces. A frozen trap blocks drainage completely until the ice thaws.
Frozen traps are most common in vacation properties, RVs, and buildings with inadequate insulation around exposed plumbing. Preventing a frozen trap generally involves insulating exposed pipe sections, maintaining consistent interior heating, or, in unoccupied buildings, draining the fixture and adding non-toxic antifreeze to the trap for the period the building remains unheated.
Do All Fixtures Need a P-Trap?
Not all fixtures require a P-trap, but every fixture connected to the drain-waste-vent system requires some form of trap to prevent sewer gas from entering the building. Fixtures with a built-in integral trap, such as most toilets, do not require a separate P-trap installation.
Toilets contain an integral trap molded into the fixture itself, which eliminates the need for a separate trap beneath the unit. Sinks, tubs, showers, washing machines, and floor drains lack an integral trap and require a separate P-trap or equivalent trap fitting installed during plumbing rough-in. A fixture connected to the drain system without any trap, integral or separate, violates plumbing code and allows sewer gas to enter the building.
P-Trap vs. House Trap: What’s the Difference?
A P-trap is a small trap installed beneath an individual fixture, while a house trap is a larger trap installed on the main building drain line where it exits the foundation, serving the entire plumbing system rather than a single fixture. House traps are also known as building traps.
A house trap blocks sewer gas from the municipal sewer line from entering the building’s entire drainage system, functioning as a secondary barrier in addition to each fixture’s individual P-trap. House traps were common in older plumbing systems and remain required in some jurisdictions, though many current plumbing codes no longer mandate them due to improved venting standards throughout the drainage system. A house trap includes its own cleanout access, since it serves as a common point for clearing blockages in the main drain line before wastewater exits toward the municipal sewer connection.