
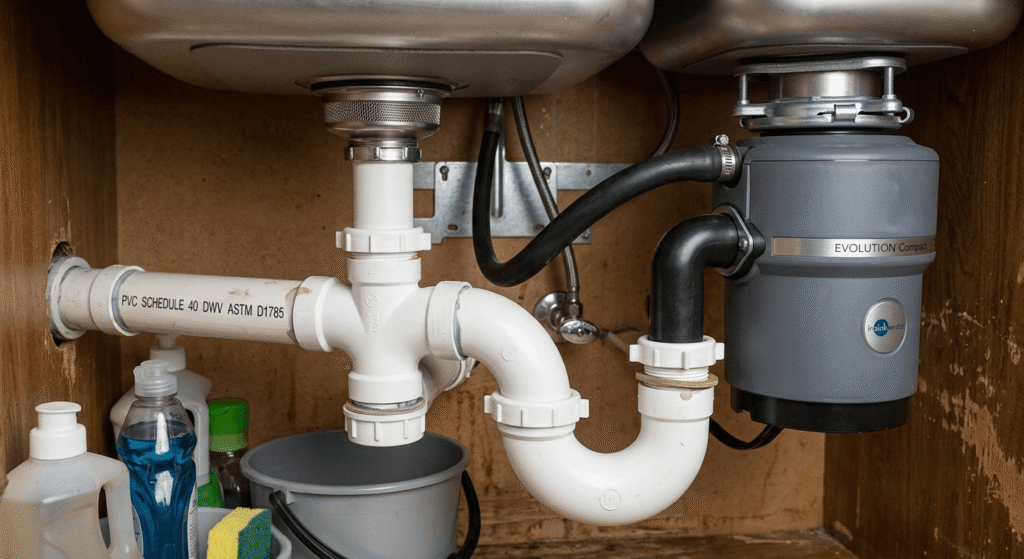
The space under a kitchen or bathroom sink contains a connected system of pipes, joints, and seals that carries wastewater from the sink bowl to the home’s main drain line. This system includes a trap, a tailpiece, slip joints, and a vent connection, along with sink-specific parts such as a garbage disposal line, a dishwasher drain, or a pop-up stopper. Each component performs a distinct mechanical function, and the combination of parts determines how well the sink drains, how the system resists leaks, and how the plumbing meets local building code.
Kitchen and bathroom drain systems share the same basic components but differ in configuration. A kitchen sink drain accommodates a garbage disposal and a dishwasher line in many installations, while a bathroom sink drain typically connects to a pop-up stopper assembly and a single fixed pipe run. Pipe diameter, trap style, and connection hardware also vary based on the fixture type and the number of drain openings.
This guide explains the individual parts of a sink drain system, the differences between kitchen and bathroom configurations, the materials and sizes used in residential plumbing, and the installation steps required to assemble or replace the system. It also covers common failure points, cost ranges for replacement, and where to source replacement parts.
Homeowners, renters performing minor repairs, and licensed contractors use this information to identify parts, diagnose leaks, and plan installations that meet code requirements.
What’s Under Your Sink? A Quick Overview
The space under a sink contains a drain trap, a tailpiece, a waste arm, slip joint connections, a drain flange with strainer or stopper, and a vent pipe connection, along with supply lines and shutoff valves for water delivery. These components connect the sink bowl to the home’s drain-waste-vent (DWV) system.
The trap sits directly beneath the sink drain opening and holds a water seal that blocks sewer gases from entering the room. The tailpiece extends from the sink strainer down to the trap, and the waste arm carries wastewater from the trap outlet to the wall or floor drain stub. Slip joint nuts and washers seal each connection point along this pipe run without requiring solvent welding, which allows the parts to be adjusted or disassembled for cleaning. A drain flange, strainer, or stopper sits at the sink opening to catch debris and, in bathroom sinks, to control water retention in the bowl. A vent pipe connects the drain system to the home’s venting network, equalizing air pressure so wastewater flows without gurgling or siphoning the trap dry. Supply lines and shutoff valves, positioned separately from the drain assembly, deliver hot and cold water to the faucet.
Anatomy of a Sink Drain System
A sink drain system is a sequence of connected components that channels wastewater from the sink bowl to the building’s drain-waste-vent piping while maintaining a sealed, leak-free path. The system follows a fixed order: water exits the sink through the strainer or stopper opening, passes through the tailpiece, enters the trap, continues through the waste arm, and joins the branch drain line that connects to the vent stack and the main drain.
Each connection along this path uses either a slip joint or a fixed fitting. Slip joints, sealed with a nut and washer, appear at points that require occasional access for cleaning or part replacement, such as the trap and tailpiece connections. Fixed fittings, which may be solvent-welded on PVC systems or threaded on metal systems, appear at points that connect to the wall stub-out or vent branch. The trap maintains a standing water seal at all times during normal use, and the vent connection allows air to enter the system so the trap seal is not pulled out by siphoning action when water drains.
The following sections describe each of these components individually.
The Drain Trap (P-Trap vs. S-Trap)
A drain trap is a curved section of pipe that holds standing water to block sewer gases from entering the building through the sink drain. Plumbing codes require every sink drain to include a trap, and residential systems use either a P-trap or an S-trap depending on the drain pipe’s orientation.
A P-trap forms a U-shaped curve that connects to a horizontal waste arm leading into the wall, while an S-trap forms a curve that connects directly into a drain opening in the floor. The P-trap includes a vented waste arm, which maintains consistent air pressure on both sides of the water seal. The S-trap lacks this vent connection on the drain side, which allows suction from draining water to siphon the trap seal and pull the water out, permitting sewer gas to enter the room. Most current plumbing codes prohibit new S-trap installations for this reason, and P-traps are the standard configuration in modern residential construction. Trap seals typically range from 2 to 4 inches in depth, and the seal can evaporate during extended periods of disuse, requiring the trap to be refilled with water.
Tailpiece and Waste Arm
The tailpiece is the vertical pipe section that connects the sink’s drain opening to the top of the trap, and the waste arm is the horizontal pipe section that connects the trap’s outlet to the wall drain stub. Together, these two parts route wastewater from the sink bowl through the trap and into the branch drain line.
The tailpiece attaches to the underside of the strainer or stopper flange with a slip joint nut and washer, and its length is adjustable by cutting the pipe to fit the distance between the sink and the trap inlet. Some installations include an extension tube between the strainer and the trap when the sink sits higher above the drain stub. The waste arm attaches to the trap outlet on one end and to the wall stub-out on the other, using slip joints at both ends in most residential installations. Plumbing code limits the waste arm’s horizontal length and required slope, typically a slope of 1/4 inch per foot toward the drain, to maintain adequate flow velocity and prevent standing water in the pipe.
Drain Flange, Strainer, and Stopper
A drain flange is the fitting that seals the drain opening to the sink basin, and a strainer or stopper is the component that sits within or above the flange to control debris and water flow. Kitchen sinks use a strainer with perforated openings to catch food particles, while bathroom sinks use a stopper mechanism to hold or release water from the bowl.
The flange seats into the drain hole with a bead of plumber’s putty or a rubber gasket, and a locknut secures it from beneath the sink to compress the seal against the basin. In a kitchen sink, the strainer body threads or locks into the flange and includes a removable basket that traps solids before they enter the tailpiece. In a bathroom sink, the stopper assembly connects to a pivot rod and clevis strap that allow the user to raise or lower the stopper from a lift knob near the faucet, controlling whether water drains or collects in the basin.
Slip Joint Nuts and Washers
A slip joint nut and washer form a compression seal that joins two pipe sections without solvent welding or threading. This connection type allows sink drain components to be assembled, adjusted, and disassembled by hand.
The washer, typically a beveled rubber or nylon ring, sits between the two pipe ends and compresses when the nut is tightened, closing any gap that would otherwise allow water to leak. Slip joints appear at the tailpiece-to-trap connection, the trap-to-waste arm connection, and the waste arm-to-wall stub connection. Because these joints rely on compression rather than a permanent bond, they can loosen over time from pipe movement, temperature changes, or repeated access, which is a common source of under-sink leaks. Hand-tightening followed by a partial turn with slip joint pliers is generally sufficient; over-tightening can crack plastic nuts or distort the washer, reducing the seal’s effectiveness.
Vent Pipe Connection
A vent pipe connection links the sink drain system to the home’s venting network, allowing air to enter and exit the pipes as water drains. This connection prevents the negative pressure that would otherwise siphon water out of the trap seal.
The vent pipe ties into the drain line downstream of the trap, either through a dedicated vertical vent stack or, in configurations permitted by local code, through an air admittance valve (AAV) installed under the sink. A vent stack routes air through the roof, while an AAV opens to admit air during drainage and closes to block sewer gas when the system is not in use. Without an adequate vent connection, water drains with a gurgling sound, and the trap seal can be pulled thin enough to allow sewer gas into the room. Code requirements specify a maximum distance between the trap and its vent connection, commonly referred to as the maximum trap arm length, which varies by pipe diameter and local jurisdiction.
Kitchen Sink Drain Components
A kitchen sink drain system includes the standard trap, tailpiece, and waste arm components along with additional connections specific to kitchen use, such as a garbage disposal unit and a dishwasher drain line. These additions distinguish kitchen plumbing from bathroom sink plumbing, which typically has a single drain path without appliance connections.
Kitchen sinks with two basins require a drain configuration that merges wastewater from both bowls into a single trap, using a continuous waste fitting or a double-outlet tee. The presence of a garbage disposal changes the tailpiece connection on the disposal side, replacing the strainer basket with the disposal unit’s discharge outlet. A dishwasher drain line, when present, connects into the disposal or into a dedicated inlet on the tailpiece above the trap.
Single-Bowl vs. Double-Bowl Drain Plumbing
A single-bowl sink drains through one tailpiece directly into the trap, while a double-bowl sink requires a continuous waste system that connects both drain openings before the water reaches a shared trap. The continuous waste fitting links the two tailpieces horizontally and directs combined wastewater down to a single trap outlet.
In a double-bowl configuration, one side of the sink, commonly the side with the garbage disposal, connects through a lower tailpiece, while the other side connects through a higher fitting that joins the waste line at an angle. This arrangement keeps both bowls draining into the same trap while allowing each bowl to empty independently. Double-bowl systems require additional slip joint connections compared with single-bowl systems, which increases the number of potential leak points under the sink.
Connecting a Garbage Disposal
A garbage disposal connects to the sink drain system by replacing the standard strainer with the disposal unit’s mounting assembly, which then discharges wastewater through a side outlet into the trap or continuous waste line. The disposal mounts to the sink’s drain opening using a flange, gasket, and mounting ring, and the unit itself hangs beneath the sink from this mounting assembly.
The disposal’s discharge tube connects to the drain trap using a slip joint, similar to a standard tailpiece connection. When a dishwasher is present, its drain hose connects to a separate inlet nipple on the disposal, positioned above the disposal’s grinding chamber. This inlet is sealed at the factory with a knockout plug that must be removed before connecting the dishwasher hose. Plumbing code in most jurisdictions requires disposal discharge lines to route through a trap before joining the main drain, and the disposal unit itself does not include or replace this trap.
Connecting a Dishwasher Drain Line
A dishwasher drain line connects to the sink’s drain system either through a dedicated inlet on the garbage disposal or through a wye fitting installed on the tailpiece above the trap. This connection allows the dishwasher to discharge wastewater into the same drain path used by the sink.
The dishwasher’s drain hose runs from the appliance to the connection point, typically rising in a high loop secured under the countertop before descending to the inlet. This high loop prevents wastewater from the sink drain or disposal from siphoning back into the dishwasher during normal use. When no garbage disposal is installed, a dishwasher tailpiece with a side inlet, sometimes called a wye tailpiece, provides the connection point instead. Local plumbing code in some jurisdictions requires an air gap fitting, mounted on the countertop or sink deck, as an additional backflow prevention measure between the dishwasher and the drain line.
Bathroom Sink Drain Components
A bathroom sink drain system uses the same trap, tailpiece, and waste arm components found in kitchen systems, but replaces the kitchen strainer with a pop-up stopper assembly and generally does not include appliance connections. Bathroom sink plumbing also varies based on whether the fixture is a pedestal sink or a vanity-mounted sink, since each style exposes or conceals the drain components differently.
The absence of a garbage disposal or dishwasher line simplifies the bathroom sink’s drain path to a single continuous run from the stopper to the trap and waste arm. The stopper mechanism, rather than a removable strainer basket, is the primary component that distinguishes bathroom sink drains from kitchen sink drains at the point of water entry.
Pop-Up Drain Assembly
A pop-up drain assembly is the mechanism that raises and lowers a stopper within a bathroom sink drain to control whether water is retained in the basin or allowed to flow through to the trap. The assembly includes the stopper itself, a pivot rod that passes through the tailpiece, a clevis strap that connects the pivot rod to a lift rod, and a lift knob mounted at the faucet or sink deck.
Lifting or lowering the knob moves the lift rod, which pivots the clevis strap and raises or lowers the stopper through the pivot rod’s connection inside the tailpiece. A gasket seals the pivot rod’s entry point into the tailpiece to prevent leaks at this joint. Some bathroom sinks use a toe-touch or push-button stopper instead of a lift-rod mechanism; these versions omit the pivot rod and clevis strap, relying instead on a spring-loaded mechanism within the stopper body itself.
Pedestal vs. Vanity Sink Plumbing
Pedestal sink plumbing exposes the trap, tailpiece, and supply lines within the pedestal base or in open view beneath the basin, while vanity sink plumbing conceals these same components inside a cabinet. This difference affects both the finish requirements for the pipes and the accessibility of the connections for maintenance.
Because pedestal sink plumbing remains visible, installations commonly use chrome-plated or decorative trap and supply line coverings instead of unfinished PVC, since the components are part of the room’s visual presentation. Vanity sink plumbing, concealed within a cabinet, does not require a decorative finish and more frequently uses standard PVC components. Access for repairs differs as well: pedestal sink components are reachable without removing cabinet panels, while vanity sink components may require kneeling inside the cabinet or removing stored items to reach the connections.
Pipe Materials and Standard Sizes
Sink drain systems use PVC plastic or metal piping, most commonly chrome-plated brass, in diameters standardized to match the connection points at the trap, tailpiece, and wall stub. Material choice affects cost, corrosion resistance, and finish appearance, while diameter selection depends on the fixture type and the size of the drain opening.
Residential sink drains are sized in two common diameters: 1¼ inch, generally used for bathroom sinks, and 1½ inch, generally used for kitchen sinks. Reducing washers allow different diameter components to connect when a mismatch occurs between the sink’s drain opening and the trap or waste arm.
PVC vs. Metal Drain Pipes
PVC drain pipe is a rigid plastic pipe that resists corrosion and is joined with slip joints or solvent-welded fittings, while metal drain pipe, typically chrome-plated brass, offers a decorative finish and is joined with slip joints designed for metal-to-metal seals. PVC is the more common choice for concealed plumbing, while metal is more common for exposed installations such as pedestal sinks.
PVC pipe does not corrode from water exposure and costs less than comparable metal components, making it the standard material for vanity and cabinet-enclosed sink drains. Metal pipe, most often chrome-plated brass or occasionally chrome-plated PVC, provides a polished appearance suited to visible installations, but brass components can corrode internally over long periods of exposure to hard water or acidic waste. Metal slip joint washers require more precise alignment than plastic ones to avoid scratching the plated finish, which can create a leak path over time.
1¼” vs. 1½” — Choosing the Right Diameter
The correct drain pipe diameter for a sink matches the diameter of the sink’s factory drain opening, which is 1¼ inch for most bathroom sinks and 1½ inch for most kitchen sinks. Installing a mismatched diameter requires a reducing washer or a reducing tailpiece to complete the connection.
A 1¼-inch pipe handles the lower drainage volume typical of bathroom sink use, such as handwashing and grooming. A 1½-inch pipe accommodates the higher drainage volume and larger debris associated with kitchen use, including food waste from a garbage disposal. Using an undersized pipe on a kitchen sink can slow drainage and increase the likelihood of clogs, while using an oversized pipe on a bathroom sink does not improve performance and may require additional adapters to fit standard bathroom drain components.
Water Supply Lines vs. Drain Lines: What’s the Difference?
Water supply lines deliver pressurized clean water to the faucet, while drain lines carry unpressurized wastewater away from the sink using gravity. These two systems remain physically separate under the sink and serve opposite functions within the plumbing system.
Supply lines are narrow, flexible or rigid tubes, commonly 3/8 inch in diameter, that connect a shutoff valve at the wall or floor to the faucet’s hot and cold water inlets. Water moves through supply lines under constant pressure from the municipal or well water system, which is why supply line failures cause immediate, forceful leaks. Drain lines, by contrast, are wider pipes, 1¼ to 1½ inch in diameter, that carry water only when the sink is in use, relying on slope and gravity rather than pressure to move wastewater to the trap and beyond. Because drain lines are not pressurized, a loose slip joint in the drain system produces a slow leak rather than a sudden burst, while a failed supply line connection produces a continuous, pressurized flow until the shutoff valve is closed.
How to Install or Replace Under-Sink Plumbing
Installing or replacing under-sink plumbing involves connecting the sink’s drain opening to the trap and wall stub, and connecting the supply lines to the shutoff valves, following the rough-in dimensions and slope requirements set by local plumbing code. The process requires assembling several slip joint connections in sequence, from the strainer or stopper down through the tailpiece, trap, and waste arm.
The installation sequence begins with the drain components and ends with the water supply connections, since the drain assembly typically determines the height and position needed for the tailpiece before the supply lines are connected to the faucet. Existing installations being replaced generally follow the same rough-in points as the original plumbing, since the wall stub-out and floor drain locations are fixed.
Rough-In Measurements and Code Basics
Rough-in measurements are the fixed dimensions, set during initial construction, that determine where drain and supply pipes emerge from the wall or floor relative to the sink location. These measurements must be matched when installing or replacing under-sink plumbing so the new components align with the existing stub-outs.
A typical drain stub-out for a bathroom sink is positioned within a code-permitted height range measured from the finished floor, while a kitchen sink drain stub-out is generally positioned lower, closer to the cabinet floor, to accommodate the additional height needed for a garbage disposal. Supply line stub-outs sit to either side of the drain stub-out, spaced to align with the faucet’s hot and cold connections. Local plumbing code, generally based on the International Plumbing Code (IPC) or Uniform Plumbing Code (UPC), also sets minimum slope requirements for the waste arm and maximum distance limits between the trap and its vent connection. Because these figures vary by jurisdiction, local code should be confirmed before installation.
Step-by-Step Drain Assembly
To assemble a sink drain system:
- Install the drain flange and strainer or stopper into the sink’s drain opening, sealing the joint with plumber’s putty or a rubber gasket.
- Secure the flange from beneath the sink with the locknut, compressing the seal against the basin.
- Attach the tailpiece to the underside of the strainer or stopper using a slip joint nut and washer.
- Connect the trap to the bottom of the tailpiece with a slip joint, positioning the trap so its outlet aligns with the wall or floor stub-out.
- Attach the waste arm between the trap outlet and the stub-out, maintaining the required downward slope toward the drain.
- Tighten all slip joint nuts by hand, then add a partial turn with slip joint pliers to seal each connection without over-tightening.
- Fill the trap with water and run the faucet briefly to check each joint for leaks.
Tools You’ll Need
Assembling or replacing sink drain plumbing requires the following tools:
- Slip joint pliers, for tightening and loosening slip joint nuts
- Adjustable wrench, for basin locknuts and supply line fittings
- Plumber’s putty or silicone sealant, for sealing the drain flange
- Hacksaw or PVC pipe cutter, for trimming tailpiece and waste arm length
- Bucket, for catching residual water when disconnecting existing pipes
- Flashlight or headlamp, for visibility inside the cabinet
- Plumber’s tape (PTFE tape), for threaded metal connections
Common Problems With Sink Drain Plumbing
Sink drain plumbing develops problems primarily at slip joint connections, within the drain path itself, and on the exterior surface of the pipes, resulting in leaks, clogs, or condensation. Each problem type has a distinct cause and requires a different repair approach.
Most under-sink plumbing problems are identifiable without removing components, since leaks appear as visible moisture or water stains, clogs cause slow or stopped drainage, and condensation appears as surface moisture on cold pipes rather than moisture originating from a joint.
Leaks at Slip Joints
Leaks at slip joints occur when the compression washer no longer forms a complete seal between two pipe sections, typically because the nut has loosened, the washer has degraded, or the pipe ends are misaligned. This is the most common source of under-sink water leaks.
A loosened nut can often be resolved by hand-tightening the connection, followed by a partial turn with slip joint pliers. A degraded or cracked washer requires replacement, since tightening a damaged washer further does not restore its seal. Misalignment between pipe sections, which can result from an improperly cut tailpiece or a trap installed at an angle, prevents the washer from compressing evenly around the pipe and requires realigning the components before retightening.
Clogs and Slow Draining
Clogs and slow draining occur when debris, grease, hair, or mineral buildup accumulates inside the trap or tailpiece and narrows or blocks the pipe’s interior diameter. The trap is the most common clog location because its curved shape allows solids to settle rather than flow through with the water.
Kitchen sink clogs typically result from grease that solidifies inside the trap or from food particles that bypass the strainer, while bathroom sink clogs typically result from hair and soap residue accumulating around the pop-up stopper and within the tailpiece. Slow draining without a complete blockage often indicates a partial buildup along the pipe walls rather than a full obstruction. Clearing a clog generally involves removing the trap to physically extract the blockage or using a plumbing snake to break up material further down the waste arm.
Mold and Condensation on Pipes
Mold and condensation on drain pipes occur when moisture from the surrounding air collects on a cold pipe surface or when a slow, undetected leak keeps the cabinet interior consistently damp. Both conditions create the moisture environment mold requires to grow on nearby surfaces.
Condensation forms when warm, humid air contacts a pipe carrying cold water, a process most noticeable on supply lines rather than drain lines, since drain pipes are not continuously filled with water. Persistent moisture from either condensation or a leak allows mold to develop on the cabinet floor, the underside of the sink, or the pipe insulation itself. Addressing the moisture source, whether by repairing a leak, insulating cold pipes, or improving cabinet ventilation, is necessary to prevent recurring mold growth, since cleaning the visible mold alone does not remove the underlying moisture condition.
How to Choose a Sink Drain Kit vs. Individual Parts
A sink drain kit includes matched components, such as a trap, tailpiece, and waste arm, packaged together for a standard installation, while individual parts allow each component to be selected and sized separately. A kit suits a straightforward replacement of an existing standard configuration, while individual parts suit installations with nonstandard rough-in dimensions, double-bowl sinks, or a mix of finishes.
A kit reduces the risk of purchasing mismatched diameters or incompatible connection types, since all components are designed to fit together. Individual parts allow for adjustments such as a longer tailpiece for a deep sink, a specific trap style required by local code, or a decorative metal finish paired with standard PVC pipe elsewhere in the system. Kits are generally more cost-effective for a single, standard drain run, while assembling individual parts is more cost-effective and more flexible for double-bowl kitchen sinks, disposal and dishwasher connections, or installations where existing stub-out positions do not match a kit’s standard dimensions.
Cost of Replacing Sink Drain Pipes
Replacing sink drain pipes typically costs between $50 and $150 for materials when performed as a do-it-yourself project, and between $150 and $400 total when a licensed plumber performs the installation, including labor. Costs vary based on pipe material, the number of components replaced, and whether the job includes a garbage disposal or dishwasher connection.
PVC components generally cost less than chrome-plated metal components with a comparable function, since PVC requires less manufacturing processing. A basic trap and tailpiece replacement sits at the lower end of the material cost range, while a full waste arm, trap, tailpiece, and strainer replacement, or a kitchen configuration involving a garbage disposal connection, sits at the higher end. Professional labor costs add to the material cost and depend on regional labor rates, the accessibility of the existing plumbing, and whether the job uncovers additional issues, such as a corroded stub-out, once the old components are removed.
Where to Buy Sink Drain Parts
Sink drain parts are available at hardware stores, home improvement retailers, plumbing supply stores, and online retailers, each offering different levels of selection and in-person assistance. Hardware stores and home improvement retailers stock standard kits and common individual parts suited to typical residential installations.
Plumbing supply stores, which primarily serve contractors, carry a wider range of specialty parts, including nonstandard diameters, decorative metal finishes, and code-specific fittings that general retailers may not stock. Online retailers offer the broadest selection and allow parts to be matched by exact diameter, material, and finish using product specifications, which is useful when replacing a single component in an existing system rather than purchasing a full kit. In-person retailers allow a physical part to be compared against the existing component before purchase, reducing the risk of a diameter or fitting mismatch.
Under-Sink Storage and Organization
Under-sink storage and organization involves arranging cleaning supplies, trash receptacles, and other stored items around the drain pipes, trap, and supply lines without obstructing access to these components. Effective organization accounts for the fixed positions of the trap and waste arm, which occupy the central and lower portion of the cabinet space.
Stackable bins, pull-out drawers, and door-mounted racks allow storage along the sides and front of the cabinet, leaving the area around the trap and slip joints clear for periodic inspection and access. Placing items directly beneath a slip joint connection increases the risk of undetected water damage if a slow leak develops, since stored items can absorb moisture before it becomes visible. Adjustable shelving designed for under-sink cabinets typically includes a cutout or gap to accommodate the trap and pipe run, allowing storage capacity to be maximized without requiring pipes to be moved or storage items to be removed to reach the plumbing for maintenance.